Santa Ynez Valley

Santa Ynez Valley
Our Backyard

Friday, August 21, 2015

Building a Motorhome - Day 11

Day 11 started at the final finish area of the Belmont painting facility.  The rest of the items that needed installation after painting were done.


Installing our roof ladder


Installing slide toppers and awnings


Entry handle with keyless entry pad


Reinstalling taillight assemblies


Installing radiator grille


Getting axle weights


The coach was then driven back to the main plant in Red Bay for final finish and inspections at that facility.


The coach ended day 11 at the tile repair station.


Thursday, August 20, 2015

Building a Motorhome - Day 10

Day 10 would be the last day of scheduled painting.  The painting would be finished unless some paint rework is needed before the coach is ready for delivery.

When we arrived in the morning, we could now see the coach with glossy paint.


This view would be short lived, because the next step would be to lightly sand the first clear coating.  This step makes the surface very smooth and ready to take two more coats of clear coat which Tiffin calls "Super Clear".


Used sanding materials after our coach has left the sanding booth


Once in the super clear booth, the coach was carefully washed down before the final coats.


We left for lunch and missed the clear coat spraying and bake booth.  When we returned, the coach had already come out of the bake booth and was having all paint masking removed and various pieces of hardware reattached.


Next, the coach was moved to the "Final Finish" area.  This is where other hardware is added after painting, such as steps, awnings, exterior lights, etc.


Installation of our electric entry steps


It was again the end of a work day.  Tomorrow the rest of the final finish at the paint factory should occur and then the coach will return to the main plant at Red Bay for finish work there and more inspections.

Building a Motorhome - Day 9

On day 9 we finally got an idea of what our finished paint scheme would look like.


When we arrived at the painting facility, the coach still had all of the masking that it had accumulated going through the striping process.


During the morning, as workers pulled off more and more of the masking, our paint scheme started to emerge.


As they were removing masking, they were also carefully inspecting the paint for areas that needed touch-up.  The areas surrounding the touch-up areas were masked as they worked.  The coach was then moved into another paint booth where those touch-up areas were resprayed.


After the touch-up booth, the remaining masking was removed.  At this point we really has a good view of our paint scheme.


At this point, the paint is pretty flat looking.  The next step involved spraying on the first two coats of clear coat.


At the end of the clear coating, the coach would move into a drying oven for about an hour.  Since it was near the end of the work day, we snapped a few images through the booth windows and left for the day.


Wednesday, August 19, 2015

Building a Motorhome - Day 8

On day 8 the motorhome got its full body paint.  We had decided to make a modification to one of the standard color schemes offered by Tiffin.


The day started with prepping the coach for the base coat.  This involved covering windows and other things that shouldn't get painted.


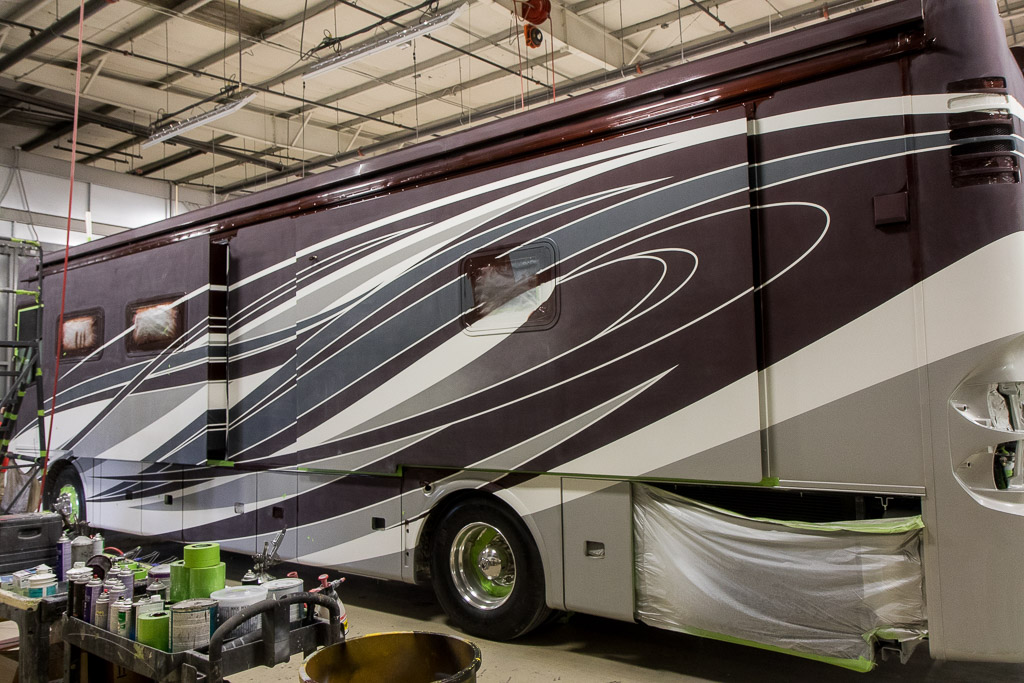
Our coach in the prep area


People working on the roof are secured by a safety harness.


This gal was applying molding which covers the joint between two sections of fiberglass.


This is one of the painting booths.  The booths have a downdraft system to pull paint fumes out of the room.


Our coach in the booth, prepped and ready for the base coat.


One of the painters getting fully suited up for spraying.


Some of the upcoming pictures had to be taken through paint booth windows of various clarity.


Cleaning the surface with tack cloths.


Spraying on multiple coats of the base coat


Base coat done, ready to move along for pattern masking.


In the next station, the masks for the paint pattern are applied.


The paint pattern masks are supplied on a series of rolled up, pre-cut, stick-on, contact-paper-like patterns.  The patterns are on a heavy craft paper, and covered by a peel-off sheet of paper.  Two workers hold the unrolled pattern straight while a third worker peels away the cover paper.


They then carefully position each section to the correct location on the coach and then use plastic blades to press the pattern onto the body.


The fully masked coach in the stripe paint booth where three additional colors will be added to the paint pattern.  This masking will preserve areas where the base coat will be left visible.


The paint kit for our coach.


The first color is sprayed in the desired parts of the pattern


After the paint dries (just a few minutes) the areas in the pattern with this first color are covered with masking before the next color is applied.


Now other areas of the pattern are painted with the second color.


Then the areas painted with the second color are covered.


Finally the third color is sprayed on the remaining unmasked areas.


This was the final step for this day.  We would have to come back the next morning to see the results.